


Flickr group
If you have made a tote bag using this tutorial, why don’t you share your pictures on this Flickr group?
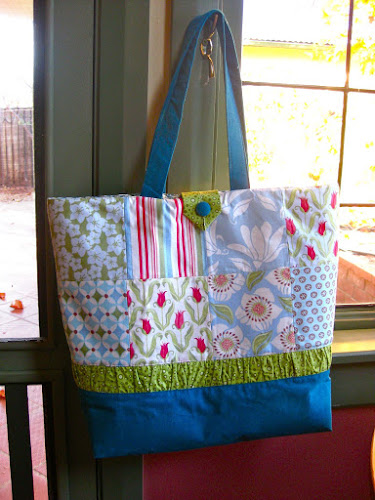
16 charms – I used Verna by Kate Spain
1/3 yard matching fabric for the bottom of the bag and the handles
1/4 yard of matching fabric for the gathered strip and the loop closure
1/2 yard of matching fabric for the lining
1 self covered button with the bottom fabric
2 pieces of batting
medium weight fusible interfacing
You may also like to watch a similar bag on this short video:
Seam allowance is 1/4 inch.
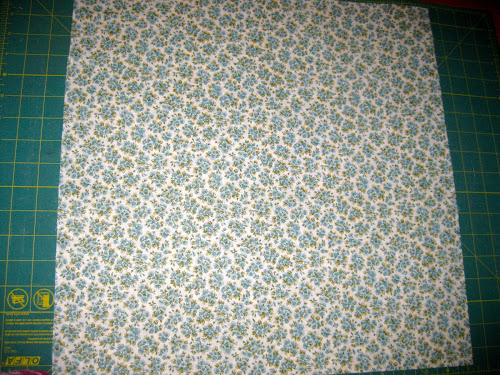
For each side of the bag, stitch 2 rows of 4 charm squares each and then 2 rows together. Iron with seams open to get a flatter look. You will end up with 2 rectangles measuring measuring 18.5in x 9.5in but measure your final rectangles well after sewing before you cut the bottom rectangles so that the width is the same.
From the matching fabric cut 2 more 8in x 18.5in rectangles to form the bottom of the bag.
Handles
Cut 2 pieces of 21in x 4in for the handles.
Cut 2 pieces of fusible interfacing slightly smaller than the handles and iron to each piece of fabric.
Fold as per picture below and iron.
Fold again and pin.
Stitch very close to the edge on both sides of the handle.

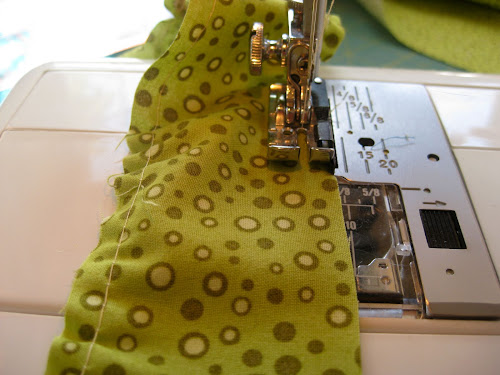
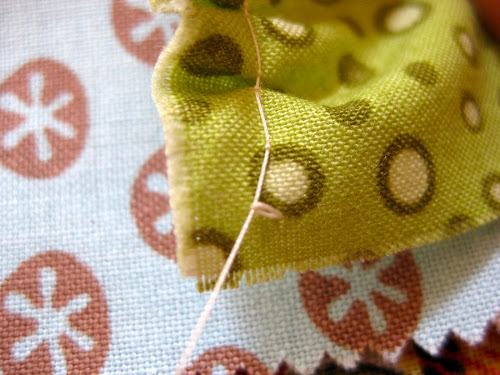
Gathered strip
Cut 2 strips of fabric measuring 2.5 in x 36 in.
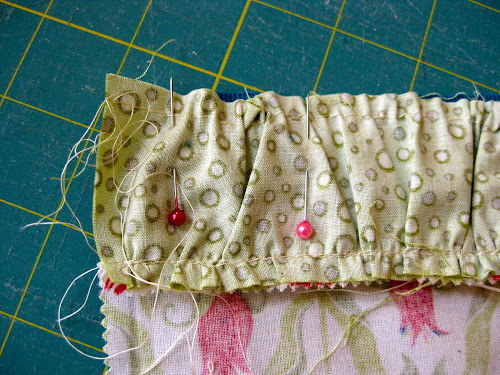
Using basting stitch, sew along the sides of the strip.
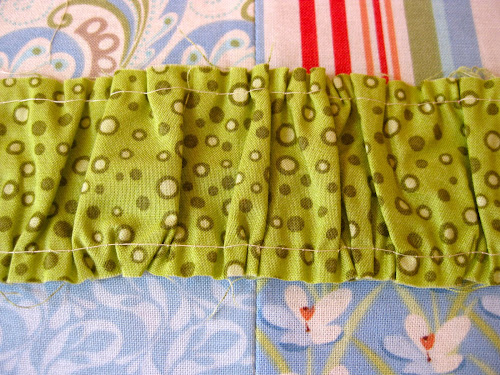
Pull from the top thread while you hold the strip of fabric.
Pull from both sides and distribute the folds along the whole strip.
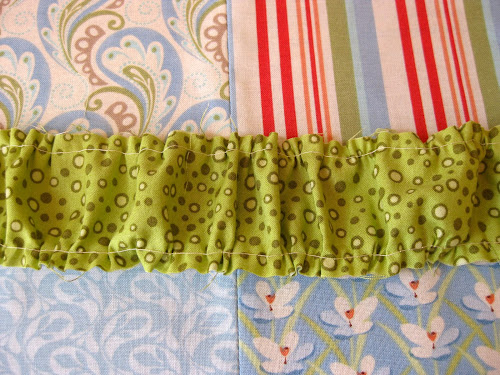
When the folds have been evenly distributed, iron the folds a bit, though this steps is not necessary.
You are now ready to piece the bag.
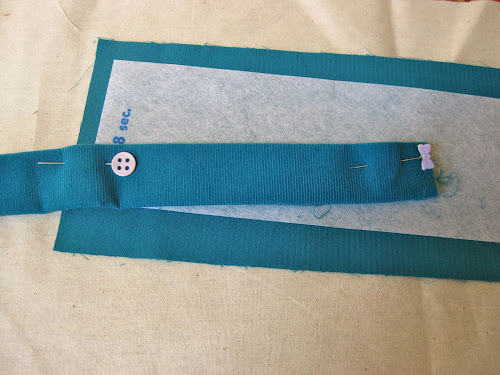
Pin the gathered strip of fabric to the charm packs which have already been pieced and stitch.
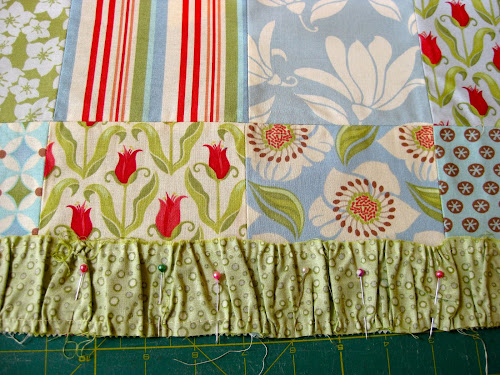
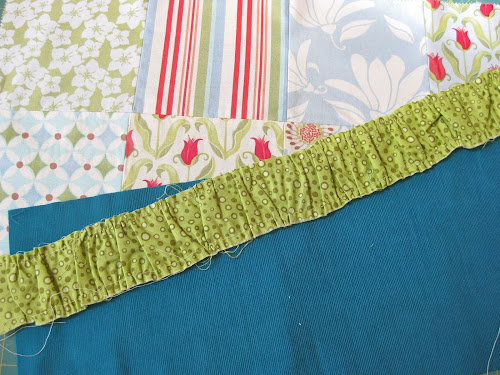
Pin the other side of the gathered fabric to the bottom fabric and stitch.
Now you have one side completed.

Do the same with the other side.
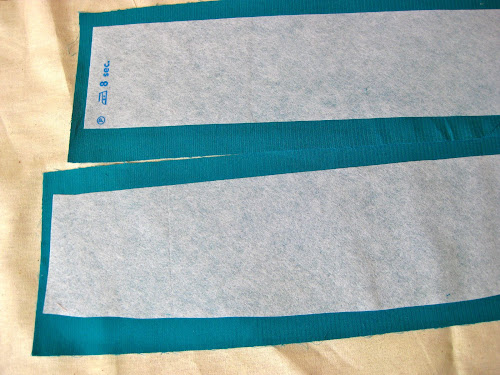
Adding interfacing
Cut a piece of fusible interfacing (medium to heavy) 1/2 in smaller than the sides of the bag. Iron to the back of each side of the bag as per instructions.
Make loop closure
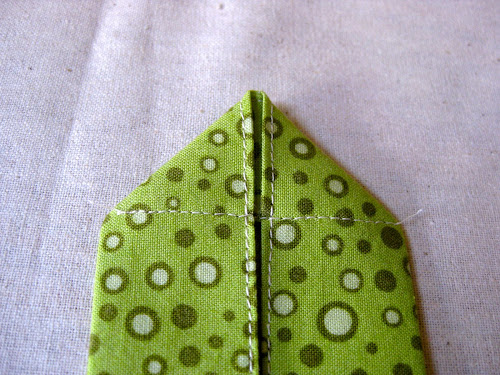
Cut a rectangle measuring 6.5in x 4in for the loop closure. Make a tube as per handles instructions. Fold and stitch as per picture.


Stitch loop as per picture.
Batting
Cut a piece of batting slightly larger than the sides of the bag and pin. Stitch across the sewing lines from the right side of the fabric.

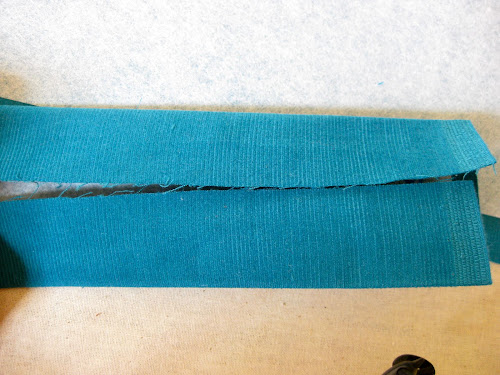
Put both sides together with right sides facing together and stitch around 3 sides leaving the side up open.
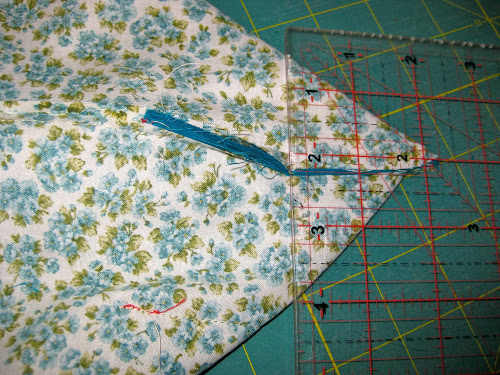
Fold the bag as per picture and make a 2 1/4 wide cut across.
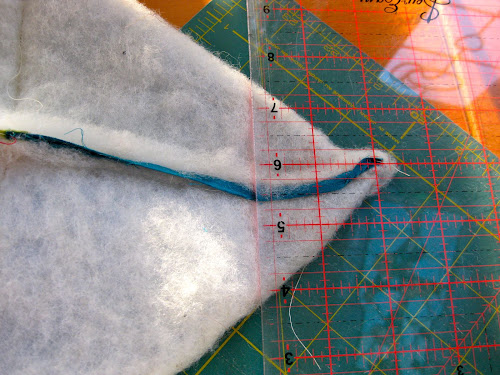
Stitch along the cut.

Turn inside out. You have finished the bag.

Lining
Cut 2 18.5in x 18.5in squares. You can use the size of the pieces to cut the lining the same size of you prefer.
Place both pieces right side together and sew around the sides and bottom. Leave 4in opening on one of the sides to turn bag inside out.
Then do as for the outside bag: cut across the corner 2 1/4 inches as per picture and stitch again.
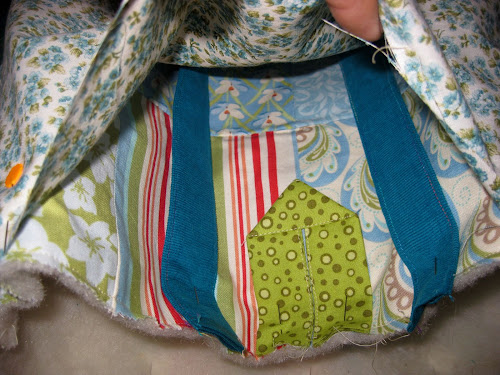
Pin loop closure and handles to the bag as per photo.
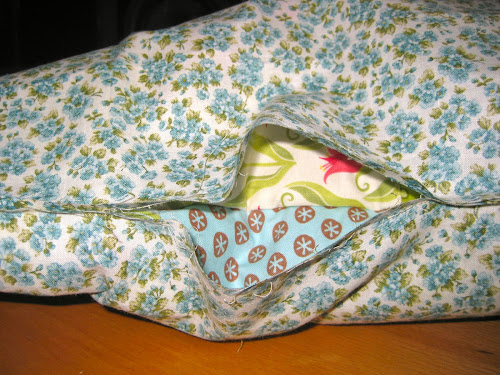
Place the lining over the outside bag as in the photo. The opening showing is the photo is about 4inches wide and will be used to turn the bag inside out once the lining and the outside a sewn together.
Stitch lining and bag together.

Turn bag inside out through the opening in the lining.
Stitch the lining opening.
Stitch across the top of the bag as per picture.

The bag is finished.
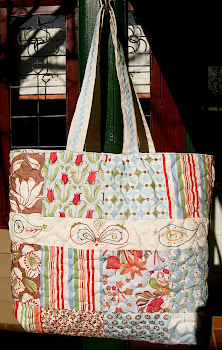
Free tote bag tutorials I’ve made


Charm pack tote bag with inside pocket tutorial

How big are “charm” squares in inches?
LikeLike
I have been resistant to buying a charm pack, thinking I can pull colors together on my own, this lovely bag shows me why a coordinated collection is superior! Very clear tutorial, may I link to my site? Thanks!
LikeLike
Cham squares are 5 inches.
LikeLike
Your tutorial is excellent!
LikeLiked by 1 person
Very cute tote. I plan on making one, but unclear on what size the gathered strip is and do you also make 2 of these?
LikeLike
Bev, sorry about that. I didn’t realise I didn’t include the sizes of the gathered strip.
You need to cut 2 strips of fabric measuring 2.5 x 23 inches each.
LikeLike
What are the finished dimensions of this bag?
LikeLike
The finished bag measures about 17 in x 18.5 in.
LikeLike
Definitely will try this some day, just one question – once the bag has been turned the correct way by pulling it through the gap in the lining, how do you stitch the lining? I can’t figure this out (very new to this). Thanks.
LikeLike
Hi, to close the lining I use a ladder stitch.
LikeLike
Love this tote! Just wondering, do you use the interfacing on the loop closure tube?
LikeLike
Courtney
The loop closure doesn´t use interfacing.
LikeLike
This is the clearest online tutorial I have followed! Love the bag I’ve made from this. Many thanks.
LikeLike
Thank you so much for a great tutorial. I just finished making this, and I must say it is the first successful tote I’ve made that I am really proud of.
LikeLike
Angela, please add a photo to http://www.flickr.com/groups/1863334@N22/
LikeLike
Hello,
You have been featured at the Wednesday WordPlay for your amazing handmade bag idea. 🙂 See yours and some other great ideas here http://craftionary.blogspot.com/2012/01/wednesday-wordplay-handmade-bags-and.html Thanks so much for the awesome idea! 🙂
I would really appreciate you linking back and sharing the featured button on your blog somewhere.
Take care!
LikeLike
Just wondering if the interfacing is necessary if you are using batting and quilting the outside part of the bag…Beautiful tote and wonderful tutorial. Thanks so much!
LikeLike
Hi Karen
You can do without the interfacing if you like. I added some stiffness. I had made another bag earlier without interfacing: https://mypatchwork.wordpress.com/2010/09/05/charms-tote-bag-with-inside-pocket-tutorial/. I stipple quilted that one but I thought the result wash´t stiff enough. So you decide! Cheers
Teresa
LikeLike
Great tutorial! You’ve been featured on the Quality Sewing Tutorials blog.
We hand select only the best free tutorials and patterns for the home sewist.
Grab a brag button!
LikeLike
Thanks for sharing your tutorial…I have also posted about it on Freebies For Crafters.
Khris
LikeLike
thanks for sharing the tutorial Teresa…I just made one for my friend’s birthday gift, she loves it! Now, I am thinking to make one for myself, I am envious to see her bag 🙂 I’ve posted and joined the Tote bags made with charmed squares on Flickr as well 🙂
LikeLike
You, have the bottom blue rectangle cut at 8 x 1.5 inches, and the gathered piece is 2.5 inches. in the picture the bottom looks larger than the gathered strip. is this a typo ?? I am getting ready to cut this out and just wanted to be sure … Thanks This will make a lovley bag for my daughter for Mothers Day !!
LikeLike
Lori
It is a typo. It should say 18.5, which is the width of the top part.
LikeLike
Thanks !!!!!!!!!!! I have every thing excet that cut and put together !!! Thanks on the timley reply. !!!!!!!!!!!!
LikeLike
This looks like fun. I can hardly wait to get started.
LikeLike
Thank you so much for the great tutorial. I am just learning to sew and quilt, so I am a beginner. This turned out so cute I feel like a pro! Thanks again……
Kelley
LikeLike
I don’t understand about cutting the 2 1/4 inch cut in the side. Can you give a little more info, please?
LikeLike
Cindy, in order to make the bottom of the bag flat you need to cut the corners of the bag and stitch the raw edges back together. My preferred method is to put the sides of the bag after stitching together as in the picture and cut off 2 1/2 inches from the point. Another way of doing that is explained here http://www.lazygirldesigns.com/blog/pdf-files/tutorial-box-the-bottom-corners-of-a-bag .
There are some videos on it http://www.youtube.com/watch?v=MC0USQnMf2Q&feature=youtube_gdata_player
LikeLike
i would like to know if i can get a copy of these bags
LikeLike
Joyce, you’d like a copy like in a made already bag? I don’t quite understand.
LikeLike
great to see the pics…
LikeLike
thanks for sharing the great tutorial.
LikeLike
Finished my bag today,made some changes though. I didn’t like the gathering after I was done, it made the bag to loose their. So I just put in a strip of another color. Also they don’t give measurements for placement for the straps, so I just guessed about 2 1/2 inches from the middle out to the edge of the strap.Then quilted the whole thing. Turned out really nice. I’m giving it away to a friend who is going into the hospital for surgery. Thanks you for the tutorial. Good pictures and instructions.
Judy
LikeLike
at the beginning it says material for lining and pockets…..I do not see any instructions for pockets????????
LikeLike
Well spotted Cheryl. There are no pockets. I didn´t include them in the end but I forgot to amend the tutorial.
LikeLike
Aloha from josie! Great pictures and explanations. I will make one this week. This will be great to carry my teaching material. I teach nursing and I need a large bag for all my stuff. I will add at least a pocket. Thanks for sharing and responding to individual questions.
Mahalo
LikeLike
EXCELLENT tutorial! I took a few liberties (cut 2.5″ squares from scraps I already had) and it came out wonderful. Posted some pics to the flickr page. Thanks for the inspiration!
LikeLike
Thank you for this great project. I used fish fabric in the gathered section. It looks really cool….like the fish are swimming in and out of the water! My finished tote looks wonderful. and your directions were great, unlike some other on-line tutorials that are very confusing and badly written with photos that don’t help at all.
LikeLike
Teresa, I started making one today for a friend. I will send you a picture when it is finished. I wish if there was some way that you could make PDF files for your tutorials. What size pockets would you put in a bag like this? I do want to add pockets. Thank you for your tutorials. I love these.
LikeLike
Hi Teresa, I made a very similar bag with a pocket earlier. You can check the pocket size here https://mypatchwork.wordpress.com/2010/09/05/charms-tote-bag-with-inside-pocket-tutorial/
LikeLike
Teresa, I may have added two pictures of this tote I made on your flickr page to the wrong place. If so, please let me know. Also, let me know what you think of it. Thanks!
LikeLike
Hi Teresa
What is your flickr user name?
LikeLike
This is a really lovely bag , and has a great well explained tutorial with it is there away I am able to print all of this on to my iPad for future reference as I would like to make this bag
LikeLike
Diane, if you have a mac you can print to PDF and save the file.
LikeLike
Love the tote but did I miss something. Is there a buttonhole on the tab closure? or is there a different type of fastener used?
LikeLike
Diane, the tab has an opening for the button, yes. Check out the pictures.
LikeLike
Hi Teresa has not started on tote yet, I have been doing a sewing alteration to a wedding dress for Saturday , thank you for being in touch. Have a stash of fabrics to use. Finishing of some knitting for grand daughters birthday, then the tote will be started.
LikeLike
Thanks, cute bag and a great tutorial!
Thanks for sharing ☺
Bente
LikeLike
Thanks so much for this great pattern and tutorial. I have made 3 bags for friends and they love them. Thanks again
LikeLike
I come across this tutorial whilst looking for Christmas gift ideas. Guess what everyone I know will be getting for Christmas.
I have heaps of charms squares laying around, just perfect for this project. I have just finished piecing the charm squares of 6 different bags. I will post some photos up when I am done.
Thank you for the easy to follow tutorial.
LikeLike
Finished my first bag today. I love it so much and I had used fabrics that I thought were ugly. Only another 9 to make, I am making them as Christmas gifts for my kids teachers and female family and friends
LikeLike
That’s a great idea. I’ve given bags away as gifts and my friends love them.
LikeLike
I MAKE BAGS SIMULIAR TO THESE AND SELL THEM AS BOOK BADS OR REUSEABLE GROCERY BAGS
LikeLike
Great Tutorial. Was able to finish the bag in a few hours. Turned out great for my first bag.
LikeLike
I love this tutorial. I have made two of these bags and I’m working on my third, but different sizes. Thank you for sharing.
LikeLike
I love your bags. Only one question, how do you put the slit in the button tab. I can’t see how that is done. Please explain in steps. Thank you.
LikeLike
Thanks Lourna. If you go to thr button tab section of the tutorial you will see the step by srep pictures with the folding that make the slit.
LikeLike
I made my first bag from your tutorial. I made it totally from left over scraps from a quilt I made. It is smaller than the pattern and I put pockets on the inside. Love the pattern! Will make another one a smaller scale now that I have made one. I don’t know how to post a picture on flickr but did put it on my facebook page.
LikeLike
For the gathered strip…the blog says “two strips of fabric measuring 2.5″x 23”, but in the tutorial it says “2 strips of fabric 2.5” x 36″… which is correct?
LikeLike
Connie, thanks for picking up the error. 36 is the correct one.
LikeLike
I made this pattern for a benefit for a coworker. She bought the fabric and I donated my time. https://www.facebook.com/photo.php?fbid=10201768802083688&set=a.1296145445640.2040051.1290455342&type=1&theater
LikeLike
Amy, thanks for showing. I can’t see it as the privacy settings for the photo are probably private.
LikeLike
Hi i have just made the tote but did it with material instead of charm squares i am very pleased with the result especially as i am new to the craft, thank you for the tutorial
LikeLike
By far the best bag tutorial I’ve found. Just made one today and it’s gorgeous – thanks very much!
LikeLike
Thank you! Comments like yours are very encouraging.
LikeLike
Hi, I am not understanding the step about putting the lining on if anyone could help me I would appreciate it. Thank you!
LikeLike
Jeannie, for the lining you need to make another sack, just like the outside. So stitch your two rectangles together and then box the corners of the lining bag the same way as you did with the outside.
Don´t turn your lining sack inside out after you finish. Make sure you have left a 3 inch opening on the bottom of the lining.
Now place the outside bag which you´ve turned inside out inside the lining.
Align the top edges making sure your handles are not caught in the seam. And stitch all around the top edge.
After stitching the top edge you need to turn the bag inside out through the opening you left in the lining box.
I hope this makes sense.
Teresa
LikeLike
Thank you Theresa I will try that and let you know how it turns out.
LikeLike
Reblogged this on Catwithoneear’s Blog.
LikeLiked by 1 person
I am super pumped to get started on this project. Fabric shopping, done! Now for the fun stuff…
LikeLiked by 1 person
Good luck with the project 😊
LikeLike
Adorable!! I will try to sew one from linen sheep fabric http://www.mylinenfabric.com/home/7-sheep-linen-fabric.html
LikeLike
My daughter worked together on his fun project and we both had fun. It was the bonding tome we had been missing. The tote turned out lovely. I think it feels like another one.
LikeLiked by 1 person
Nice! I’m so happy my tutorial helped 😊
LikeLike
This is what i am looking for. Thanks for sharing such wonderfuldiy tutorial.
LikeLike
Thank you for sharing this DIY tutorial.
LikeLike
What size button do you use?
LikeLiked by 1 person
A thumb size button is sufficient but you can use a larger one of you prefer.
LikeLike
I have got as far as the stage of joining the lining to bag and think measurements may be wrong for the lining pieces. It says use two 17.5inch squares so lining is 17 1/2inches wide but the bag width is made from 4 charms so 5inch squares. Joining four together with 1/4inch seams means bag is 18.5inches wide so my bag lining is one inch too small…or what am I doing wrong?
LikeLike
The lining should be the same as the outside you’re right. I’ll correct.
LikeLike
Made it, very happy with it!
LikeLiked by 1 person
That’s great Suzanne. You could share a picture in my Facebook if you want
LikeLike
I HAVE A QUESTION BEV ASKED IT THEN BUT I AM UNCLEAR ON THE ANSWER. SHE ASKED RE THE 2.5″ X 36″ STRIPS…WE ARE TOLD TO USE BASTING STITCH AND GATHER EDGES, BUT NOT TOLD HOW LONG THE STRPS SHOULD BE AFTER WE GATHER THEM. THERE IS A COMMENT CONTAINING AN ANSWER OF I BELIEVE 23″ BUT IS SAYS CUT TO 23″…DID U MEAN GATHER TO 23″?
LikeLike
Jan, the strip should be the same width as the piece you’re stitching it to.
LikeLike
What size button did you use?
LikeLike
I love this bag. I am not great at sewing and I was able to make a really cute bag that I will be filling with comfort items (blanket, stuffed animal, book) and gifting to a group that brings them to at risk children. Thank you for this pattern. I plan on making more.
LikeLike
Love the bag. The instructions are detailed
I can’t wait to try it!!
LikeLiked by 1 person
is there a place on this website where I can print the instructions for the charm tote?
LikeLiked by 1 person
Hi Anna,
I have a written tutorial for this bag https://teresadownunder.com/2011/05/02/tote-bag-tutorial/
LikeLiked by 1 person
This bag is really interesting and needs improvements. I shared your post for getting an idea with my daughter. I think she will add something special to it after that we’ll share with you. Currently, we are preparing for her birthday in the coming days and getting stuff from Balloons lane store.
LikeLiked by 1 person