
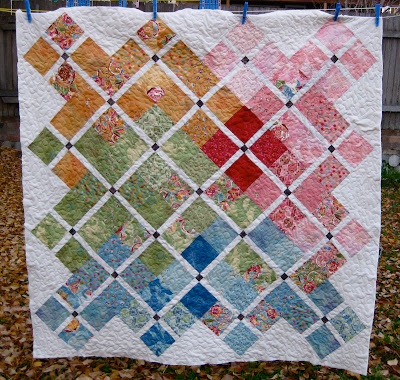
Sizing
Finished quilt size is 56 x 56 inches.
Quilt top and back
Materials
- 3 charm packs with 42 x 5 inch squares each in total for front and back. The front uses 100 charm squares. I used Moda Boutique charm packs
- 1 fat quarter of dark fabric for the small squares
- over 4 yards of off-white fabric

Quilt top block construction
Finished block size (before assembly) is 10 inches.
The top is made out of 25 blocks in total assembled with a traditional centre sashing technique.
For each block you will need to cut:
- 4 charm squares
- 4 x 1 ½ inch x 5 inch strips
- 1 x 1 ½ inch small square
For the whole quilt top you will need:
- 100 5 inch squares
- 100 5 x ½ inches white strips
- 25 1 ½ x 1 ½ small centre squares
Assemble squares to suit your taste. I paired 2 of each fabric design in one single colour where possible. This tutorial illustrates how the blocks are assembled. I did the assembly in the traditional centre sashing technique.
Finished block size is 11 ½ inches.

For the off-white corner blocks and triangles cut:
- three 16-inch blocks cut on both diagonals
- two 8 3/8″ blocks cut once on the diagonal
I used How to set on point tutorial to help me calculate the size of the off-white blocks.

Back of the quilt
- 25 charm squares
- 20 x 5 inch squares in white
- 5 inch white/cream fabric strips
- 10 inch wide strips for the border
Piece as per picture alternating 5 inch white/cream squares and the charm squares.
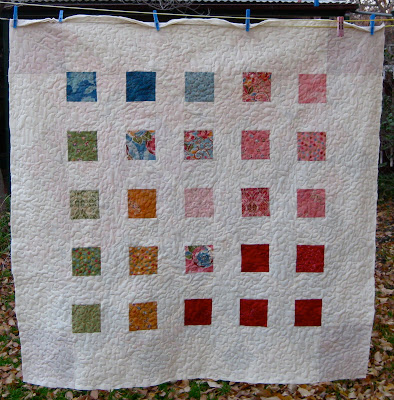
The quilt is stipple quilted and the binding is the same fabric as the background cream.
Thanks to Julie from Stoneview for helping me adjust the fabric requirements and measurements.
Thanks to Marcia for suggesting the quilt a name.

This is wonderful! Amazing what one can do with a charm pack and white fabric!
LikeLike
This is really nice. I love patterns that rely on fat quarters. What is the anticipated finished size of the quilt?
LikeLike
The finished size is 56in x 56in. I’ll add pictures of the finished quilt soon, once I stitch the border.
LikeLike
Love this quilt- popped over from Mel’s blog! I think this would make a great baby quilt using smaller squares! Thanks for all the details!
LikeLike
This is adorable! Thank you for sharing.
LikeLike
What a stunningly beautiful quilt! It has inspired me to make one for my grand-daughter’s high-school graduation. Are there detailed instructions for assembling the blocks? I think I can assemble the quilt itself from the tutorial you link to. . . but not sure of the best way to assemble the blocks.
Thank you so much!
LikeLike
Vera I assembled the quilt in blocks of 4 charm squares joined with some white strips and a centre corner. This tutorial illustrates http://nonniequiltingdreams.wordpress.com/2011/08/05/a-discussion-between-friends/
LikeLike
Thanks for your quick reply. One more quick question. The photo of the finished quilt shows 100 charms. The directions says “4 charm squares per block, 64 squares in total”
Is the photo of a larger quilt? I really do want the quilt to be 56 x56″. Thanks so very much!
LikeLike
Vera
Thank you for pointing out the error to me. You’re right. Unfortunately I don’t have the quilt anymore as it was a gift.
I measured it after the quilt was finished so I’m pretty sure it is 56 inches square.
LikeLike
Thanks for letting me know, Teresa. It is indeed a beautiful quilt. I don’t know how you were able to part with it!
V
LikeLike
Hey, numbers are looking much better! Check the “for each block” numbers though, they are still off and “for the whole quilt” section it should be 25 1 1/2 by 1 1/2. Finished block size is 10 I think and don’t forget 20 5″ white squares for the back.
It was such a fun quilt to make. Another learning experience!
LikeLike
I’d like to make this for my granddaughter but don’t know how to convert this to a queen size. Any suggestions?
LikeLike
Marylin, I wouldn’t kniw how to convert this to QS either. Never done that. Maybe do a block,madd sashing, measure it and then use that as a base to calculate the rest.
LikeLike