


The finished notebook cover measures 15 inches x 9 inches.
Your fabric should be your notebook’s height and width plus 1 inch.

Materials
Fabric
Lining: 1 rectangle 16″ x 10″
Pockets: 4 rectangles 10″ x 5″
Cover: 1 rectangle 16″ x 10″. Mine is made of 3 pieces patched together with the following measurements:
- 1 rectangle 16″ x 6 1/4″
- 1 rectangle 16″ x 3 1/4″
- 1 strip 16″ x 1 1/2″
Fusible interfacing (iron on one side)
Lining and cover: 2 rectangle 15″‘ x 9″
Pockets: 4 rectangles 9″ x 4″
1 elastic ban
1 fabric covered button
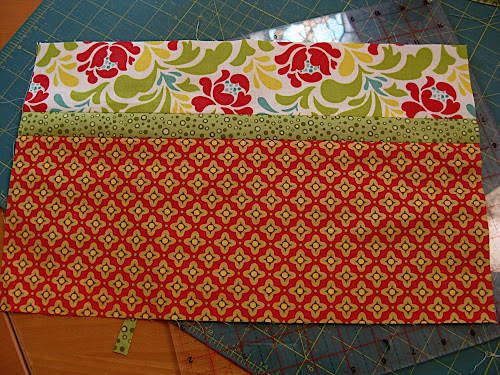
Stitch all three rectangles together to make the cover.
Iron with the hems open.

Cut all your other pieces.
Stitch your pockets to make 2 squares. Iron with the hems open.

Fold the cover in two along the long side and make a marking in the middle. Stitch the elastic band where the marking is with the elastic band placed facing inside the fabric (see picture).

Iron the interface to the inside of the fabrics. Getting the interfacing to stick to the fabric when the cover is turned inside out is tricky.

Iron the pocket in half, wrong sides together and pin to the sides of the lining as per the above picture.

Place the cover on top, right sides together, as per the picture.

Pin in place and stitch all around leaving a 4 inch gap to turn the cover inside out.

The corners need to be trimmed after stitching to reduce the bulk after turning inside out.

After turning the cover inside out you end up with a neat cover. The turning is quite tricky because the fusible interface tends to come loose. Pinning it in place temporarily may work.
Try to fit the notebook in the cover now. This may give you an indication of how closely you need to stitch around the cover.
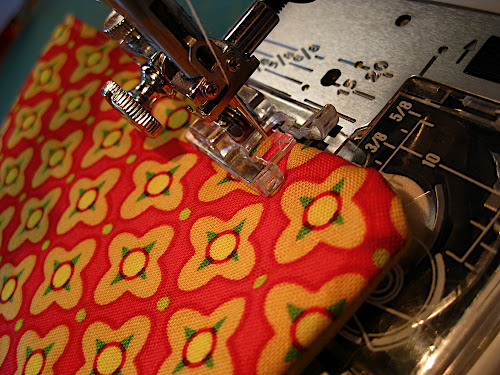
Top stitch around very close to the edge, about 1mm or 2mm depending on how tight you want the cover to fit.

The corners are almost inevitably round unless you have removed much of the fabric on the inside hem.
The book cover is finished.

Place the notebook inside.

Voila!

I used a fabric covered button because I think it looks smart but you could use a plain button. Also, instead of an elastic band you could use a ribbon, in which case it would need to be stitch to both sides of the cover.

I made this notebook cover following By small means tutorial. I changed a couple of things as I went along.
Other notebooks


See also the notebook cover PJ did based on this tutorial.

Lovely!! I posted a link to your tutorial on Craft Gossip Sewing:
http://sewing.craftgossip.com/tutorial-patchwork-notebook-cover/2009/11/18/
–Anne
LikeLike
Thanks for the great tutorial. This is exactly what I was looking for!
LikeLike
This is perfect! I have a few birthdays coming up and I think I will try some this weekend. Thanks for sharing.
LikeLike
Hi there! 🙂
I love your tutorial, and I posted it on my blog: http://mojezielonewzgorze.blogspot.com/2010/02/kalendarz-w-nowej-odsonie.html
Thanks for sharing! 🙂 Great blog! 🙂
LikeLike
Thanks for a fab tutorial.. Ihave used it to make a travel journal cover for a friend going to Paris …I had the cutest Paris fabric in my stash and this was the perfect project for it !
Your tute was clear and concise and I am thrilled with how my cover turned out .
Cheers,
PJ
LikeLike
Thanks so much for this tutorial, I have all these scraps of fabric and now I know what to use them for!
Arlene
LikeLike
Fantastic tutorial… keep up the good work! I am addicted to your blog and have added it to the RSS app on my iPad so I never miss a post!
LikeLike
thank you Jay!
LikeLike
Hi, a friend and I made the notebook cover today and we love it, however, we cannot find a 15 x 9 book for it. Any suggestions on where we can get this size book?
LikeLike
Hi, I bought mine in the supermarket (Woolworths, Australia). 9×15 is the standard size for most medium size notebooks.
LikeLike
Hi Teresa, we were able to make the noebook with no problem but I guess 15 x 9 is not a common notebook size here in the U.S. We didn’t think to get the notebook first and base out measurements off of that because we were too excited to make it!!! Now we both have a great 15 x 9 empty cover…but it looks great. If anyone knows where we can find a 15 x 9 notebook/journal for our beautiful covers, please let us know!!
Thanks!!
LikeLike
2 dollar shops in Australia carry odd size of items sometimes.
LikeLike
I am in the U.S. I even looked on line and haven’t found anything, we have this beautiful cover and nothing to fill it!!! 😦 I checked the office supply stores since they have the biggest selection. Do you know the brand of book, maybe I can find it on line??
Thanks
LikeLike
This is the notebook that goes with my cover: http://corporate.esselte.com/enAU/Innovations/Spirax_Hard_Cover_Notebooks.html
This may be obvious to you but the 15 inch is the width of the opened notebook.
LikeLike
Thanks SO much. I am going to order one tonight!!!
LikeLike
I looked at the link that you sent and I am going to try to find them on line. Do you happen to know if that is the A4, A5, or A6 size?? They are in mm rather then inches. Thanks again.
Carla
LikeLike
In mm the cover measures 22.5 mm x 17 mm. The product numer is
Spirax 511 Hard cover 56511 WW
You can check against paper sizes in Wikipedia here http://en.wikipedia.org/wiki/ISO_216
LikeLike
According with this site the notebook is A5: http://www.getprice.com.au/Note-Book-Spirax-511-A5-Hardcover-Red-Gpnc_576–40240621.htm
LikeLike
I emailed th stores and one came back but they do not ship to the U.S. Do you have any extra on hand that you want to sell???? 🙂 If so, I will take a few!!!
LikeLike
They´re quite heavy, the shipping would be expensive is my guess. Like the notebooks are about $6 or $7 Australian dollars but they weight about 350gr each. You’d be better off buying something locally. A5 is a standard size, you should be able to buy one over there. Amazon carries some A5 notebooks: http://www.amazon.com/Livescribe-Single-Subject-Notebooks-4pk/dp/B002M3HO0M or http://www.amazon.com/Whitelines-Wire-Squared-Notebook-Supporting/dp/9186177133/ref=sr_1_1?ie=UTF8&qid=1291699415&sr=8-1 or the full listing for “A5 notebooks” http://www.amazon.com/s/ref=nb_sb_noss?url=search-alias%3Daps&field-keywords=a5+notebooks&x=0&y=0
LikeLike
I saw those but I don’t have much use for the graph paper..What doe the A4, A 5 stuff stand for?? We don’t have that in the U.S. The only thing I was able to find was a calendar in that size which I don’t really use.
LikeLike
I am looking at the links that you sent me of the A 5 notebooks but they aren’t the correct size 15 x 9’s???
LikeLike
The book is a5. 15 * 9 is the measure of the book when open. The grandLuxe a5 notebook in amazon is similar to mine. My notebook also has lines, it’s not blank.
LikeLike
wow these are really beautiful! I will give it a try!
LikeLike
Hi I Really Like your great tutorials!!!
I Link to you on my Blog,
http://paneamoreecreativita.it/blog/2011/07/raccolta-di-progetti-di-cucito-creativo-per-lestate
Thanks for sharing 🙂
LikeLike
Hi! My name is Jen Price and I write for Today’s Mama. I am currently working on a Back To School Crafting roundup to post next week. I love this notebook cover tutorial! I wanted to link to you in my roundup and ask your permission to use your photo in my post. Let me know if that’s ok!
Thanks,
Jen
LikeLike
Thank you for a wonderful tutorial. I’ve been trying to figure out how to dress up notebook/ composition books to use as journals for some teenagers. This is the perfect solution!!!
LikeLike
bellisimos!!
LikeLike
I love these notebooks, I can see half a dozen on the shelf next to me now! Such a nice way to dress them up. Off to raid my stash – fabric and notebook!
LikeLike
I saw this on Pinterest and had to come check out your blog! Love it! 🙂
LikeLike
Thanks Teresa. I’ve just started doing some book covers using your tutorial. The tutorial is so helpful. From another down under crafter. Xxx
LikeLike
Thank you very much for your time and generosity in sharing this. The darling little “E” on the last picture was just the inspiration I needed for a totally different project. Thank you. I’ll link back when I post it. The project is s skirt that needs a shirt to match. I want to try to applique something on a t-shirt. I think I’ll try a letter or a heart. I like the blanket stitch you’ve used. 🙂 Sandy
LikeLike
I just a cover for a scrapbook. I adjusted the measurements to fit. I love it! Thank you for the tutorial.
LikeLike
This would be great out of oil cloth for wipe-clean convenience.
LikeLike
Good tutorial, however, what were your seam allowances? And couldn’t the pockets be made from two solid pieces of fabric, rather than four?
LikeLike
Hi Sherri, seam allowance is 1/4 inch. You could use two pie es instead of ffour, yes.
LikeLike
Good grief – that’s a hell of a notebook you’ve got there ! 15′ x 9′ – !! do you mean 15″ x 9 ” – ha ha
LikeLike